As a part of the digitization project for Association of University and College Employees (AUCE) fonds, we digitized an audio cassette tape entitled “The Steward”, which is a speech recording about being a union steward. Today, we will show how we digitize an audio cassette tape.

Equipment
To digitize a cassette, we use the following equipment:
- Cassette tape deck: An ION Tape 2 PC USB cassette deck
- Audio capture and editing software: We use Audacity, a free, open-source application
- Computer: A Mac Pro running macOS 10.14.5
Damage repair
Before starting the digitization, we had to repair the tape as it was broken (this is common with older cassette tapes), and we took this opportunity to put the tape in a new housing (the original housing is shown above). It is important to have the tape in optimal condition before digitization and preservation.
Digitization Process
We followed the sample workflow for tape digitization in the Audacity wiki.
- First, the cassette deck (Tape 2 PC) is connected to the Mac to export the audio for digitization. We connected the USB cable directly to a free USB port on the Mac, and turned it on.

USB port is on the left. The Tape 2 PC also has an RCA output.
- Since we are using a Mac, we needed to set up an audio input to ensure that the Tape 2 PC signal could be picked up by the Audacity software. We set a sample rate of 44100 Hz and 16-bit format which is the standard for CD burning. For more information, please follow the instructions in the Audacity wiki, Mac and USB input devices.
- Once all the settings were made, we did a test recording and made sure the levels were correct (i.e. no clipping, a form of sound distortion). We aimed for a maximum peak of -6 dB.

The green bar should not reach more than -6 dB.
- Then we started the digitization. We played the cassette in the deck first and clicked the recording button in Audacity immediately after. Since we recorded both sides of the tape, we paused the recording after the first side and resumed after switching to the second side.
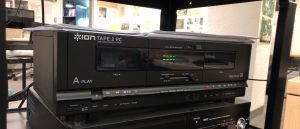
Cassette is played for digitization.
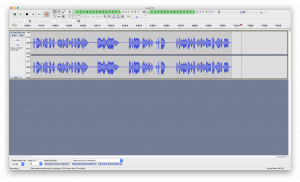
Audacity interface on the Mac.
Exporting a file for access and preservation
Once the tape is digitized, we exported the file in WAV format. WAV with linear (uncompressed) PCM is a preferred and recommended format for long-term preservation. Once we upload it to our content management system, we will digitally preserve it with Archivematica.
For access purposes, we converted the WAV file to MP3 format. MP3 is a compressed audio file which is widely supported and playable on nearly all devices with a more manageable file size.
Once metadata is created for the exported file, the audio will be ready to upload.
Please find the recording on UBC Rare Books and Special Collections’ Access to Memory (AtoM) database. The audio will soon be available in Open Collections!